
You Either Die A Hero, Or You Live Long Enough To See Yourself Become The Villain.
Aaron Eckhart’s Harvey Dent
Hello Stackers, RabbitMQ is one of the many message brokers. We can analogize it to a post office. When we want to send a letter, put the letter in the post box. From the post box, the letters will be served first at the post office to be filtered and sorted according to the region or regions of the recipient of the letter. And then the post office will assign a postman to deliver the letter to the recipient.
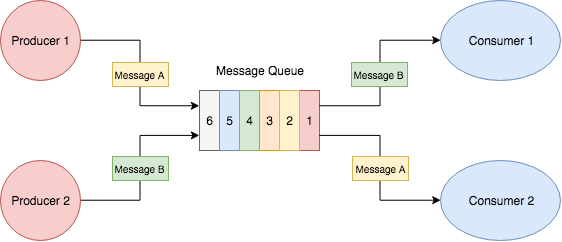
Well, in this analogy, RabbitMQ is the post box, post office, and postman. Whoever receives the message manages the message to be sent where as well as sends it to the recipient. And generally, the messages in RabbitMQ that are sent to the receiver are used to trigger a job to be done by the receiver. For example, RabbitMQ keeps a message queue containing email addresses and email content. When RabbitMQ sends the message to the recipient, the recipient will send an email with the purpose and content of the email in accordance with the message received from RabbitMQ.
Quick Start
Installation : RabbitMQ speaks multiple protocols. This tutorial uses AMQP 0-9-1, which is an open, general-purpose protocol for messaging. There are a number of clients for RabbitMQ in many different languages. We’ll use the amqp.node client in this tutorial.
npm install amqplib
Sending: We’ll call our message publisher (sender) send.js and our message consumer (receiver) receive.js. The publisher will connect to RabbitMQ, send a single message, then exit.
var amqp = require('amqplib/callback_api');

amqp.connect('amqp://localhost', function(error0, connection) {
    if (error0) {
        throw error0;
    }
    connection.createChannel(function(error1, channel) {
        if (error1) {
            throw error1;
        }

        var queue = 'hello';
        var msg = 'Hello World!';

        channel.assertQueue(queue, {
            durable: false
        });
        channel.sendToQueue(queue, Buffer.from(msg));

        console.log(" [x] Sent %s", msg);
    });
    setTimeout(function() {
        connection.close();
        process.exit(0);
    }, 500);
Receiving: That’s it for our publisher. Our consumer listens for messages from RabbitMQ, so unlike the publisher which publishes a single message, we’ll keep the consumer running to listen for messages and print them out.
var amqp = require('amqplib/callback_api');

amqp.connect('amqp://localhost', function(error0, connection) {
    if (error0) {
        throw error0;
    }
    connection.createChannel(function(error1, channel) {
        if (error1) {
            throw error1;
        }

        var queue = 'hello';

        channel.assertQueue(queue, {
            durable: false
        });

        console.log(" [*] Waiting for messages in %s. To exit press CTRL+C", queue);

        channel.consume(queue, function(msg) {
            console.log(" [x] Received %s", msg.content.toString());
        }, {
            noAck: true
        });
    });
});
Now we can run both scripts. In a terminal, from the rabbitmq-tutorials/javascript-nodejs/src/ folder, run the publisher:
./send.js
then, run the consumer:
./receive.js
The consumer will print the message it gets from the publisher via RabbitMQ. The consumer will keep running, waiting for messages (Use Ctrl-C to stop it), so try running the publisher from another terminal.
Okay, that’s All, for the full doc please refer on here. cya.