
Alright guyssss… welcome back to our channel… Kali ini kita lanjutkan kembali Svelte kita yahhh .. materi kali ini cukup menarik ya karena kita akan membuat sesuatu seperti chatbot.. oke langsung aja…
npm i elizabot
buat file BeforeAndAfterUpdate.svelte
<script>
	import Eliza from 'elizabot';
	import { beforeUpdate, afterUpdate } from 'svelte';

	let div;
	let autoscroll;

	beforeUpdate(() => {
		autoscroll = div && (div.offsetHeight + div.scrollTop) > (div.scrollHeight - 20);
	});

	afterUpdate(() => {
		if (autoscroll) div.scrollTo(0, div.scrollHeight);
	});

	const eliza = new Eliza();

	let comments = [
		{ author: 'eliza', text: eliza.getInitial() }
	];

	function handleKeydown(event) {
		if (event.key === 'Enter') {
			const text = event.target.value;
			if (!text) return;

			comments = comments.concat({
				author: 'user',
				text
			});

			event.target.value = '';

			const reply = eliza.transform(text);

			setTimeout(() => {
				comments = comments.concat({
					author: 'eliza',
					text: '...',
					placeholder: true
				});

				setTimeout(() => {
					comments = comments.filter(comment => !comment.placeholder).concat({
						author: 'eliza',
						text: reply
					});
				}, 500 + Math.random() * 500);
			}, 200 + Math.random() * 200);
		}
	}
</script>

<div class="chat">
	<h1>Eliza</h1>

	<div class="scrollable" bind:this={div}>
		{#each comments as comment}
			<article class={comment.author}>
				<span>{comment.text}</span>
			</article>
		{/each}
	</div>

	<input on:keydown={handleKeydown}>
</div>

<style>
	.chat {
		display: flex;
		flex-direction: column;
		height: 100%;
		max-width: 320px;
	}

	.scrollable {
		flex: 1 1 auto;
		border-top: 1px solid #eee;
		margin: 0 0 0.5em 0;
		overflow-y: auto;
	}

	article {
		margin: 0.5em 0;
	}

	.user {
		text-align: right;
	}

	span {
		padding: 0.5em 1em;
		display: inline-block;
	}

	.eliza span {
		background-color: #eee;
		border-radius: 1em 1em 1em 0;
	}

	.user span {
		background-color: #0074D9;
		color: white;
		border-radius: 1em 1em 0 1em;
	}
</style>
dan selanjutnya.. kita import aja langsung ke App.svelte ..
<main>
<h1>Hello {name}!</h1>
<p>Visit the <a href="https://svelte.dev/tutorial">Svelte tutorial</a> to learn how to build Svelte apps.</p>
<Counter />
<Toggle />
<Img />
<String />
<Statement />
<Condition />
<Nested answer={42}/>
<Nested/>
<Info {...pkg}/>
<IfLogin />
<Comparison />
<EachYoutube />
<KeyEachThing />
<GenerateNumber />
<MouseMove />
<MouseMoveInlineHandler />
<EventModifier />
<AlertCompEvent />
<AlertEventForwarding />
<CustomButtonComp />
<TextInput />
<NumericInput />
<CheckboxInputs />
<GroupInputs />
<TextareaInputs />
<FileInput />
<SelectBindings />
<SelectMultiple />
<EachBlockBindings />
<MediaElements />
<Dimensions />
<BindThisCanvas />
<ComponentBindings />
<OnMount />
<OnDestroyIntervals />
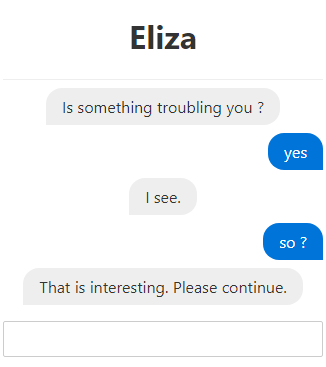
<BeforeAndAfterUpdate />
</main>result akan seperti ini …
Okay berhasil yagesya… link github ada disini…. cyaaaa…