
Introduction
In web projects, besides the front-office — the user interface, we also have the back-office, the interface for admins. This is where we perform CRUD operations. This page, mostly made up of data tables and editing forms is usually used by “experienced users”. In addition, the time allocated for it in the project is also less than the front-office page. Therefore, an obvious need is a tool that reduces time and effort to build the admin page.
In this article, I’m going to use AdminJS to build an administration web app. I will take the recruitment management application to introduce some concepts of the library. This application has the following features:
- Manage open positions
- Manage email templates & send emails to candidates
- Manage candidates & interviews
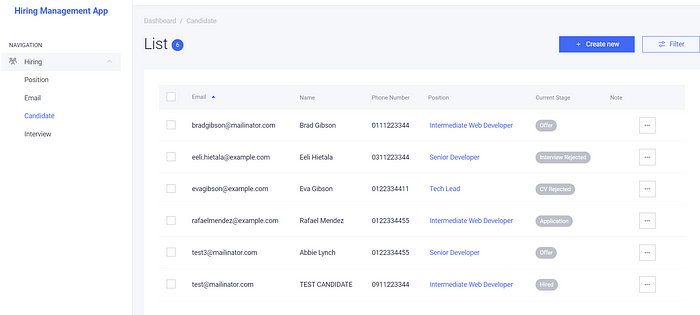
We will implement a simple hiring process consisting of 3 steps: checking CV, interview, and offer. It’s a CRUD+ application with 90% of its features are CRUD. The “plus” part is to perform the hiring process logic and send emails to candidates. By the end of the article, you will understand some key concepts and be able to use AdminJS to speed up your project. Along with AdminJS, this application uses some popular technologies in web development: Node.js, Express, React, MongoDB. Here are some pages of the application. We’ll have them all at the end.
Are you ready? Let’s go!
Getting Started — Setup project
In addition to some libraries listed above, we’ll have express-formidable that is recommended by the AdminJS team to parse incoming requests. We also use dotenv to manage environment variables, nodemailer to send emails and nodemonto auto-reload the application on changes.
mkdir hiring-adminjs
cd hiring-adminjs
npm init -y
npm i --save express mongoose adminjs @adminjs/express @adminjs/mongoose express-formidable dotenv nodemailer nodemon
Speaking of folder architecture, we will organize by components. At the top level, we have app.js to run the server, config.js to manage the application’s config.
hiring-adminjs
-app.js
-config.js
-.env
In the config.js file, we read environment variables and exports, so every file in the project can use them.
require("dotenv").config();
const DB_SERVER = process.env.DB_SERVER || "localhost";
const DB_PORT = process.env.DB_PORT || "27017";
const CONNECTION_STRING = `mongodb://${DB_SERVER}:${DB_PORT}`;
const DBNAME = "hiring";

const SENDER_HOST = process.env.SENDER_HOST;
const SENDER_PORT = process.env.SENDER_PORT;
const SENDER_ADDRESS = process.env.SENDER_ADDRESS;
const SENDER_NAME = process.env.SENDER_NAME;
const SENDER_PASSWORD = process.env.SENDER_PASSWORD;

module.exports = {
    CONNECTION_STRING,
    DBNAME,
    SENDER_HOST,
    SENDER_PORT,
    SENDER_NAME,
    SENDER_ADDRESS,
    SENDER_PASSWORD
}
In the app.js file, in addition to classic Express boilerplate code, we require AdminJS related libraries (lines 4–7), then init the AdminJS instance (line 13) and mount the AdminJS routes to the Express application (line 21).
// require libraries
const express = require('express');
const mongoose = require('mongoose');
const AdminJS = require('adminjs');
const AdminJSExpress = require('@adminjs/express');
const AdminJSMongoose = require('@adminjs/mongoose');
AdminJS.registerAdapter(AdminJSMongoose);

// app config
const config = require("./config");

// init adminJS
const adminJS = new AdminJS({
    databases: [],
    rootPath: '/admin',
});
const adminJSRouter = AdminJSExpress.buildRouter(adminJS);

// mount adminJS route and run express app
const app = express();
app.use(adminJS.options.rootPath, adminJSRouter);

mongoose.connect(`${config.CONNECTION_STRING}/${config.DBNAME}`, {
    useNewUrlParser: true,
    useUnifiedTopology: true,
    useFindAndModify: false,
});

app.listen(8080, () => console.log('AdminJS is under localhost:8080/admin'));
Run the application by typing nodemon app.js then go to localhost:8080/admin you will see the default screen of AdminJS.
Congratulation! You just set up the backbone of the application and run it. Let’s move to the next parts where we will add functionalities.
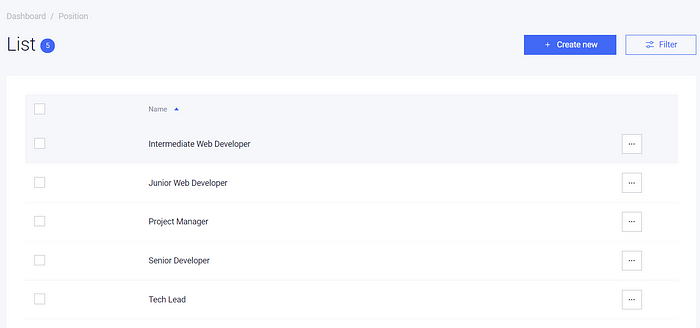
Feature 1 — Manage open position — The basics of AdminJS
For entity Position, we need basic CRUD operations. AdminJS helps us to do this in less than 5 minutes.
mkdir position
touch position/position.model.js
touch position/position.options.js
In the file position.model.js, we define the schema of the entityPosition as a normal application. The PositionSchema contains only the name field. For example, we can have Junior Web Developer, Project Manager, etc…
const mongoose = require('mongoose');
const PositionSchema = new mongoose.Schema({
    name: { type: String },
});
const Position = mongoose.model('Position', PositionSchema);

module.exports = {
    PositionSchema,
    Position,
}
In the file position.options.js, we define the options for entity Position, AdminJS will use options in this file to render the interface. In the simplest form, the option has only one field resource that points to the model we defined above. So the data we see and manipulate in the interface will come from and be saved to the corresponding collection. AdminJS allows us to customize the resource, we’ll do it when needed. For now, the below code is sufficient.
const { Position } = require("./position.model");

const PositionResourceOptions = {
    resource: Position,
}

module.exports = {
    PositionResourceOptions
}
In the main file app.js, we require the position.options.js file then add PositionResourceOptions to the resources options of AdminJS.
....
const { PositionResourceOptions } = require("./position/position.options");
....
const adminJS = new AdminJS({
  databases: [],
  rootPath: '/admin',
  resources: [PositionResourceOptions]
});
...
Reload the application and refresh the page, you’ll see the entry Position in the left menu. Click on the line you see the list of Position. For now, it’s empty. You can start to add a new entry, then see a single entry, edit and delete it.
We just finished the feature “manage open positions” with just a few like of code! The CRUD API and the interface have been done by AdminJS.
Feature 2 — Manage & send emails to candidates — Adding custom code to AdminJS
This feature helps us define some emails template and send emails to candidates in the situations below:
- The candidate’s CV is good and we invite the candidate to interview.
- The candidate’s CV is not suitable. We inform the candidate.
- The interview goes well. We contact the candidate for further exchanges.
- The interview isn’t good. We inform the candidate.
Manage email templates
We create the folder and the necessary files for the features. The role of each file is in the comment
mkdir email
touch email/email.model.js # The schema of email entity
touch email/email.options.js # Used by AdminJS to render the GUI
touch email/email.sender.js # Reponsible for sending email
touch email/email.route.js # Expose the API to be called by the frontend
The email schema will contain the name of the template, the subject, and the body of the email.
const mongoose = require('mongoose');
const EmailSchema = new mongoose.Schema({
  name: { type: String },
  subject: { type: String },
  body: { type: String },
});
const Email = mongoose.model('Email', EmailSchema);
module.exports = {
  EmailSchema,
  Email
}
We use the same code in the previous feature for email.options.js. The only difference is to use type richtextfor the email body. AdminJS will use a WYSIWYG editor for fields of this type.
const { Email } = require("./email.model");
const EmailResourceOptions = {
  resource: Email,
  options: {
    properties: {
      body: {
       type: "richtext",
      }
    }
  },
}
module.exports = {
  EmailResourceOptions
}
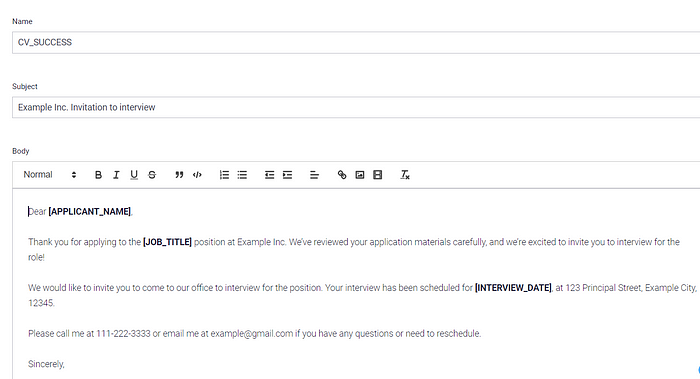
Like above, we need to add the EmailResourceOptionsto the resources property of AdminJS in the app.js. Reload the application, you can now see the list of email templates by clicking the new entry in the left menu. From this screen, you can create and edit the 4 templates we mentioned above. Here is the screen to edit the template email for inviting the candidate to interview.
Implement API to send emails
After creating all the templates, now we need to prepare the API to send emails. The API accepts 3 parameters: receivers, subject and body for the address to send the email, the subject, and the content of the email respectively. Here is the code in file email.route.js.
const express = require("express");
const router = express.Router();
const sender = require("./email.sender");
router.post("/sendEmail", function (req, res, next) {
  try {
    const sendEmailRequest = {
      receivers: req.body.receivers,
      subject: req.body.subject,
      body: req.body.body,
  }
  sender.sendEmail(sendEmailRequest);
  res.json({ success: true });
  } catch (error) {
   next(error);
  }
});
module.exports = router;
In the email.sender.js file, we use the librarynodemailer. We need to config the transport instance with the host, port, address, and the password of the account used to send emails. For example, Gmail accounts will use smtp.gmail.com as the host and the port is 587.
const nodemailer = require("nodemailer");
const config = require("../config");
const transporter = nodemailer.createTransport({
  host: config.SENDER_HOST,
  port: config.SENDER_PORT,
  secure: false, // true for 465, false for other ports
  auth: {
    user: config.SENDER_ADDRESS,
    pass: config.SENDER_PASSWORD
  }
});
module.exports = {
  sendEmail: function (params) {
     let { receivers, subject, body } = params;
     const mailOptions = {
       from:{
        name: config.SENDER_NAME,
        address: config.SENDER_ADDRESS,
       },
       to: receivers,
       subject: subject,
       html: body
     };
     transporter.sendMail(mailOptions)
       .then(() => {
          console.log("Email sent");
       })
       .catch(error => {
          console.log(`Error when send email : ${error.message}`);
          throw error;
       });
   },
};
Finally, in the app.js file, we require the route and mount to the application. AdminJS routes and our custom routes co-exist in the Express server. If you’re familiar with the Express built-in parsers, you can use them after the AdminJS routes like below. If not, you can use req.fields instead of req.body to access the data as mentioned on the express-formidable npm page.
...
app.use(adminJS.options.rootPath, adminJSRouter);
// custom route
const emailRoute = require("./email/email.route");
app.use(express.json()); // after mounting adminJS route to avoid conflict
app.use("/emails", emailRoute);
// error handler
app.use(function (err, req, res, next) {
   console.error(err.stack);
   res.status(500).json({ success: false, message: "INTERNAL_ERROR" });
});
app.listen(8080, () => console.log('AdminJS is under localhost:8080/admin'));
You can now reload the application and test the API by Postman. Make sure all the emails work. They will be used in the next feature.
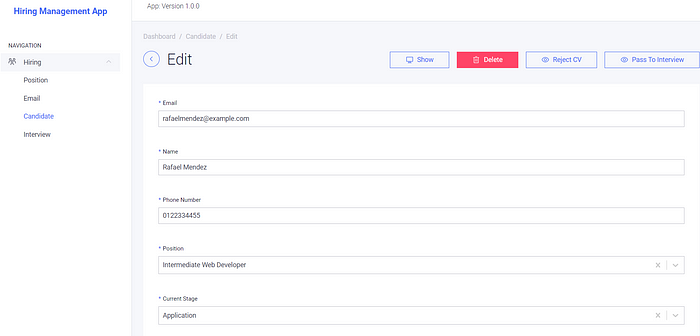
Feature 3 — Manage candidates & interviews — Customize resources and actions in AdminJS
CRUD operations — Customize resource
Up to this point, we have Position and Email entity defined. They are satellites of the main entity Candidate. To be concise, I won’t post the duplicate code because you’re already familiar with it.
In the candidate schema, we have name, email, phoneNumber, position, currentStage and note . The position field point to Position collection.
About the options, we can customize the resource to have a friendly interface.
- Set the
isVisiblefield to false to hide a field in all screens. For example, I don’t want to see the field _id because it’s meaningless and takes a lot of space.
options: {
  properties: {
   _id: {
      isVisible: false
   },
   ....
}
- For a candidate, the email is required and has to be a validated one. For that, we can use props just like we pass attributes to the HTML input field
options: {
  properties: {
   ...
   email: {
      props: {required: true, type : "email"}
   },
   ....
}
- The field
currentStagedefines where the candidate is in the hiring process. As mentioned above, our process has 3 stages: checking CV, interview, and offer. This field has predefined values which can be listed usingavailableValues.
options: {
  properties: {
   ...
   currentStage: {
       availableValues: [
       { value: "CHECK_CV", label: "Application" },
       { value: "CV_REJECTED", label: "CV Rejected" },
       { value: "INTERVIEW", label: "Interview" },
       { value: "INTERVIEW_REJECTED", label: "Interview Rejected" },
       { value: "OFFER", label: "Offer" },
       { value: "HIRED", label: "Hired" },
   ]
},
   ....
}
As you may guess, AdminJS will use a select input to render this field. This is more convenient than a default input text. The labelis displayed while the valuewill be saved in the database.
- For a reference field, we need to tell AdminJS which collection it points to.
options: {
  properties: {
   ...
   position: {
      reference: "Position"
   },
   ....
}
AdminJS will use a select input to render this field. All the positions we’ve defined will be listed. This helps us avoid human errors.
You can see more options on the documentation page and further customize the resource according to your needs.
Manage interviews
Before going to implement the hiring process, we need to create the entity Interview. We’ll create an interview if the candidate has a suitable CV for the position.
In the interview schema, we have 2 fields: candidateIdthat points to the Candidate collection and date. Because candidateIdis a reference field, don’t forget to customize this field in the options file.
Add 2 new resources to AdminJS options in file app.js. We have the new screens in the interface.
Take a breath and we continue to the second part of this feature — implementing the hiring process.
Implement the hiring process — Customize actions
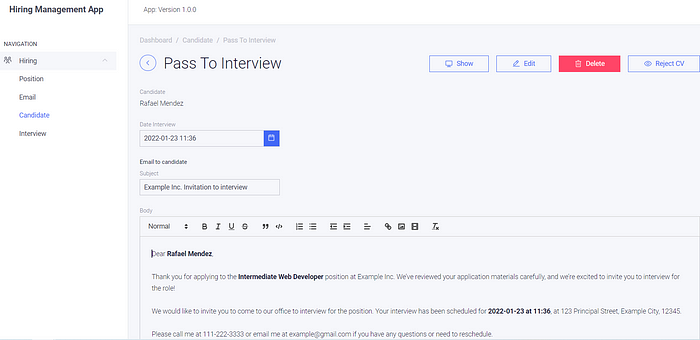
AdminJS has 7 predefined actions: list, search, new, show, edit, delete and bulk delete. For a candidate, we will add 4 actions: Reject CV, Pass to interview, Decline after interview and Accept after interview. Below is the specification for the “Pass to interview” action.
Action: Pass to interview
When: If currentStageis CV_CHECKING
Behaviors:
- A new screen is displayed allows the user to select an interview date.
- After confirmation, the
currentStagechanges to INTERVIEW. The corresponding email is sent to the candidate’s address with the date chosen.
To define an action of resource, we add the action name as a key of the actions property. The action has some properties:
- actionType: it can be
resource,recordorbulktype. This is the target of action. Based on the value, the action will touch the whole collection, a single record, or some records respectively. - isVisible: it can be a boolean value or a function that returns a boolean value. We can use it to specify the condition when the action is possible.
- handler: the function that prepares the data for the React component. The data returned from this function will be accessible from the component’s props.
- component: point to the React file to render the interface.
For the “Pass to interview” action, according to the specification above, we have:
const isCheckingCV = ({ record }) => {
  return record.params.currentStage === "CHECK_CV";
}
const cvResponseHandler = (request, response, context) => {
   const candidate = context.record;
   return {
     record: candidate.toJSON(),
   }
};
.....
options: {
  properties: {
   ....
  },
  actions: {
    PassToInterview: {
      actionType: 'record',
      isVisible: isCheckingCV,
      handler: cvResponseHandler,
      component: AdminJS.bundle('../public/pages/cv-response'),
    },
}
Because “Pass to interview” and “Reject CV” actions are very closed. We use the same file for them. In that file, we will get the current action and display elements accordingly. We need to create a folder to store React files.
mkdir -p public/pages
touch public/pages/cv-response.jsx
In the cv-response.jsx file, we have to:
- Get candidate data from props
- Load the right email content and display elements based on the action. If the CV is passed, we need a field to select the interview date.
Here is the outline of the cv-response.jsx file:
import ...
const CVResponse = (props) => {
  const isCVAccepted = props.action.name === "PassToInterview";
  const candidate = props.record.params;

  const [subject, setSubject] = useState("");
  const [body, setBody] = useState("");
  const [date, setDate] = useState(new Date());
  // based on isCVAccepted value, get the right email content
  function getEmailContent() {}
// utility functions
  async function sendRequestCreateInterview() {}
  async function sendRequestUpdateCandidate({ stage }) {}
  async function sendRequestSendEmail() {}
  function displayMessage() {}
  useEffect(() => getEmailContent(), []);
  async function createInterview() {
     try {
        sendRequestCreateInterview();
        await sendRequestUpdateCandidate({ stage: "INTERVIEW" });
        await sendRequestSendEmail();
        displayMessage("success");
     } catch (error) {
        displayMessage("error");
     }
  }
  async function rejectCandidate() {
     try {
        await sendRequestUpdateCandidate({ stage: "CV_REJECTED" });
        await sendRequestSendEmail();
        displayMessage("success");
     } catch (error) {
        displayMessage("error");
     }
  }
return (
      <div>
          {/* Display candidate info */}
          {/* If isCVAccepted, display the datepicker to select     interview date */}
          {/* Display email content, placeholders are filled by candidate information */}
          {/* The button to confirm action  */}
          {/* Other elements: message to display when action has  been done successfully or there is an error */}
      </div>
  );
}
export default CVResponse;
Reload the application, and select a candidate whose currentStageis CHECKING_CV, you will see the new action display in the top right corner. Click on the button, the page cv-response.jsx is displayed.
The 2 other actions: Decline and accept after the interview follow the same logic. You need to change to the isVisiblecondition and create a new React file for them.
Up to this point, you have the hiring process complete! Although there is a lot of points that we can improve, my tutorial is technically finished. You can use the concepts above to further customize and develop the application. For the complete code, you can refer to my Github page here.
My thought about AdminJS
- This library does save a lot of time & effort in building the back-office page. Some must-do work has been done for us: basic CRUD APIs, data tables, filter, editing form…
- If we compare it to some administration templates in the market, we see that:
+ It’s free!
+ It not only provides the UI system but also the backend part.
+ The UI system helped me a lot when building the customized pages. It is quite easy to learn and use.
– Still, the AdminJS UI system is not as rich as in templates. For example, I had to customize the Message component instead of using Toastr, which I’m familiar with when using templates. This is comprehensible because the library doesn’t focus only on the UI side. But I think it would be better if the team can add more UI components. - The integration is smooth. AdminJS code can co-exist with ours. That enables endless capabilities to customize.
- It’s quite confusing for me for the first time to deal with resource options. They are used to define how the page looks but locate in the “backend” part. I feel like the backend and frontend are mixed. If I want to change an icon in the UI, I need to restart the server. And each time I restart the server, the application needs to re-bundle the code. This will take some time.
Reference: Using AdminJS to quickly build an admin web app | JavaScript in Plain English